server {
        listen       3660; #//端口号
        server_name  localhost; #//域名,主机头值

        #charset koi8-r;

        #access_log  logs/host.access.log  main;

        location / {
            root   "E:\workspace\HLWechatMall"; #//站点根目录
            index  index.html index.htm index.php; #//默认页
        }

        #error_page  404              /404.html;

        # redirect server error pages to the static page /50x.html
        #
        error_page   500 502 503 504  /50x.html;
        location = /50x.html {
            root   html;
        }

        # proxy the PHP scripts to Apache listening on 127.0.0.1:80
        #
        #location ~ \.php$ {
        #    proxy_pass   http://127.0.0.1;
        #}

        # pass the PHP scripts to FastCGI server listening on 127.0.0.1:9000
        #
        #location ~ \.php$ {
        #    root           F:\\PHP;
        #    fastcgi_pass   127.0.0.1:9000;
        #    fastcgi_index  index.php;
        #    fastcgi_param  SCRIPT_FILENAME  /scripts$fastcgi_script_name;
        #    include        fastcgi_params;
        #}

        #ThinkPHP配置
        location ~ .*\.php.* {
            root           F:\\PHP; #//ThinkPHP框架文件位置
            fastcgi_pass    127.0.0.1:9000;
            fastcgi_index   index.php;
            include fastcgi.conf;
            set $real_script_name   $fastcgi_script_name;
            fastcgi_param   SCRIPT_FILENAME $document_root$fastcgi_script_name;
            fastcgi_param   SCRIPT_NAME     $real_script_name;
            fastcgi_param   PATH_INFO       $path_info;
            if ($fastcgi_script_name ~ "^(.+?\.php)(/.+)$") {
                set $real_script_name   $1;
                set $path_info  $2;
            }
        }

        # deny access to .htaccess files, if Apache's document root
        # concurs with nginx's one
        #
        #location ~ /\.ht {
        #    deny  all;
        #}
    }
作者: janing
【算法】Knuth 洗牌算法
适用于打乱一串数组,同时也适用于在数组中随机抽取多个元素不重复
var knuth = (arr)=>{
    var swap = (ar, ia, ib)=>{
        var temp = ar[ia];
        ar[ia] = ar[ib];
        ar[ib] = temp;
    };
    var rand = (a,b)=>{
        return Math.ceil(a) + Math.floor(Math.random() * Math.floor(b-a));
    }
    for(var i = arr.length - 1; i >= 0 ; i -- )
        swap(arr,i, rand(0, i)) // rand(0, i) 生成 [0, i] 之间的随机整数
    return arr;
}
knuth(new Array(8).fill(0).map((item,index)=>index));
PacVim 引入cursesw.h失败的解决方案
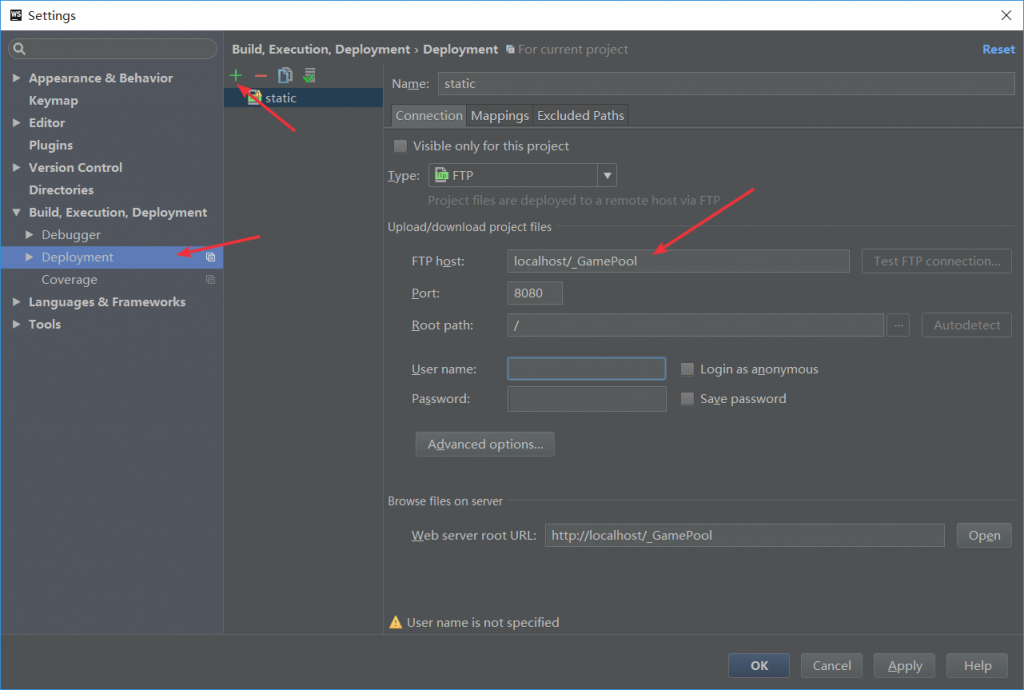
webstorm 项目分离后,获取资源跨域的问题,可以通过配置服务器映射来解决
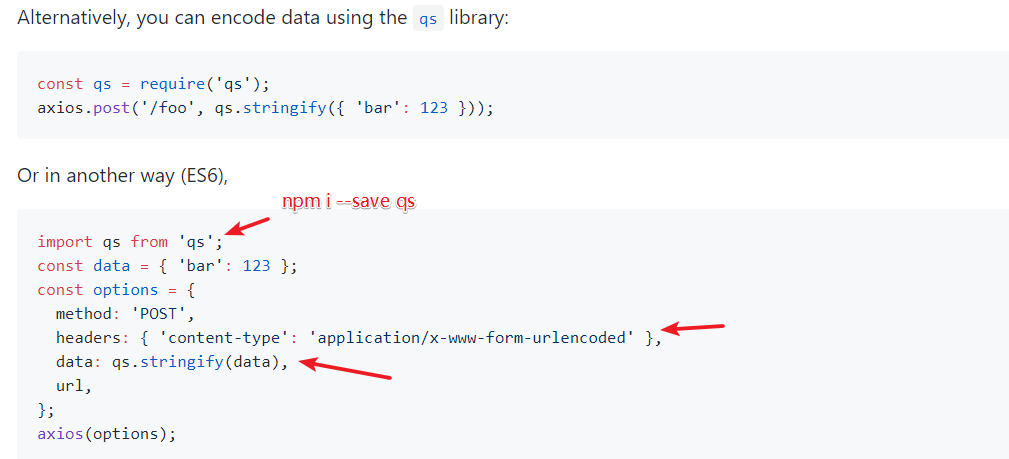
axios 发送post请求,包含json数据时,OPTION报跨域问题
出现这个问题,涉及到post发送json数据时,强制要求先发送一次OPTION来跟服务器验证。
要绕过这个问题,就要发送字符串,并且content-type要配置为application/x-www-form-urlencoded
参考
https://segmentfault.com/q/1010000007665348
https://github.com/axios/axios#using-applicationx-www-form-urlencoded-format
layabox实现自定义动画
来源:tanglijun
<!DOCTYPE html>
<html lang="en" dir="ltr">
  <head>
    <meta charset="utf-8">
    <title></title>
    <script src="./LayaAirJS_1.7.19.1_beta/js/libs/laya.core.js"></script>
    <script src="./LayaAirJS_1.7.19.1_beta/js/libs/laya.webgl.js"></script>
  </head>
  <body>
    <script>
      (function() {
        var Sprite  = Laya.Sprite;
        var Stage   = Laya.Stage;
        var Event   = Laya.Event;
        var Browser = Laya.Browser;
        var WebGL   = Laya.WebGL;

        var ape;
        var scaleDelta = 0;

        ;(function () {

          // 不支持 WebGL 时自动切换至 Canvas
          Laya.init(Browser.clientWidth, Browser.clientHeight, WebGL)

          Laya.stage.alignV = Stage.ALIGN_MIDDLE
          Laya.stage.alignH = Stage.ALIGN_CENTER

          Laya.stage.scaleMode = 'showall'
          Laya.stage.bgColor = '#232628'

          createApe()
        }());

        function createApe() {
          ape = new Sprite();

          // 加载图片
          ape.loadImage('./res/apes/monkey2.png');

          // 添加图形到舞台中
          Laya.stage.addChild(ape);

          // 设置中心点 (monkey2.png 110 * 145)
          ape.pivot(55, 72);

          // 设置图形的 x 坐标
          ape.x = Laya.stage.width / 2;

          // 设置图形的 y 坐标
          ape.y = Laya.stage.height / 2;

          // 设置没 1 帧的动画
          Laya.timer.frameLoop(1, this, animate);
        }

        function animate(e) {

          // 旋转角度增加 2 度
          ape.rotation += 2;

          // 设置心跳缩放比例
          scaleDelta += 0.02;
          var scaleValue = Math.sin(scaleDelta);
          ape.scale(scaleValue, scaleValue);
        }
      })()
    </script>
  </body>
</html>vue-cli资源路径问题(webpack)
来源:https://blog.csdn.net/w1170375057/article/details/79036694
关于在vue项目中资源路径问题
在写vue项目时往往面临这些问题
1. 图片引入使用绝对路径,不会经过编译,小图片不会编译成base64形式
2. 打包之后的文件,全部使用绝对路径,部署时带来大量路径问题
其实这些问题都可以通过对webpack的配置文件进行更改来解决
资源路径
在引入资源时使用,别名alias,vue init webpack生成的项目在build/webpack.base.conf.js文件中进行更改
    alias: {
        'vue$': 'vue/dist/vue.esm.js', // 默认的
        '@': resolve('src'),  // 默认的
        'assets': resolve('src/assets')  // 自己定义的
    }
之后再项目中就可以使用了
img src="~assets/images/[图片名]"> // images: src/assets 下存放图片的文件夹
backgroud: url(~assets/images/[图片名])
js中 直接用 assets/...,不需要加 ~
打包 build时
打包时,可以将路径全部改成相对路径,个人认为有利于部署,以下配置为在使用上一条配置的情况下进行
1. 修改config/index.js文件中build对象中的
assetsPublicPath: '/'  // 改为:
assetsPublicPath: './'
修改build/utils.js, 针对css样式文件,因为在使用别名的情况下,打包出来的css文件中资源文件的引入方式为 static/*
// Extract CSS when that option is specified
// (which is the case during production build)
//if (options.extract) {
//  return ExtractTextPlugin.extract({
//    use: loaders,
//    fallback: 'vue-style-loader'
//  })
//} else {
//  return ['vue-style-loader'].concat(loaders)
//}
// 新增一条属性publicPath
// publicPath (打包时改用相对路径,在static/*前面加上publicPath)
if (options.extract) {
  return ExtractTextPlugin.extract({
    use: loaders,
    fallback: 'vue-style-loader',
    publicPath: '../../'
  })
} else {
  return ['vue-style-loader'].concat(loaders)
}
欢迎大家指出问题,一起交流。
cocos KeyError: u’custom’
报错
编译模式:release
Traceback (most recent call last):
  File "D:\CocosSoftware\Cocos2d-x\cocos2d-x-3.13\tools\cocos2d-console\bin\/cocos.py", line 998, in <module>
    run_plugin(command, argv, plugins)
  File "D:\CocosSoftware\Cocos2d-x\cocos2d-x-3.13\tools\cocos2d-console\bin\/cocos.py", line 916, in run_plugin
    plugin.run(argv, dependencies_objects)
  File "D:\CocosSoftware\Cocos2d-x\cocos2d-x-3.13\tools\cocos2d-console\plugins\plugin_compile\project_compile.py", line 1550, in run
    self.build_web()
  File "D:\CocosSoftware\Cocos2d-x\cocos2d-x-3.13\tools\cocos2d-console\plugins\plugin_compile\project_compile.py", line 1233, in build_web
    build_web.gen_buildxml(project_dir, project_json, publish_dir, buildOpt)
  File "D:\CocosSoftware\Cocos2d-x\cocos2d-x-3.13\tools\cocos2d-console\plugins\plugin_compile\build_web\__init__.py", line 73, in gen_buildxml
    arr = _getJsListOfModule(ccModuleMap, item)
  File "D:\CocosSoftware\Cocos2d-x\cocos2d-x-3.13\tools\cocos2d-console\plugins\plugin_compile\build_web\__init__.py", line 118, in _getJsListOfModule
    tempList = moduleMap[moduleName]
KeyError: u'custom'
解决方法
//文件frameworks\cocos2d-html5\moduleConfig.json
//其他代码
"external" : ["box2d", "chipmunk", "socketio", "pluginx", "gaf"],

        "custom" : ["core", "audio", "gui", "editbox", "cocostudio", "shape-nodes", "render-texture"]
bootstrap Validator v0.5.1-dev 爆炸坑
参考
http://1000hz.github.io/bootstrap-validator/#
http://formvalidation.io/download/
http://blog.csdn.net/u013938465/article/details/53507109
神奇的变量命名
a:
b: 需验证字段
c: message容器/配置
d: 表单元素的type
默认字段
获取方式 $.fn.bootstrapValidator.DEFAULT_OPTIONS
{
    "elementClass": "bv-form",
    "message": "This value is not valid",
    "group": ".form-group",
    "container": null,
    "threshold": null,
    "excluded": [
        ":disabled",
        ":hidden",
        ":not(:visible)"
    ],
    "feedbackIcons": {
        "valid": null,
        "invalid": null,
        "validating": null
    },
    "submitButtons": "[type=\"submit\"]",
    "live": "enabled",
    "fields": null
}
fields={
    container
    excluded
    feedbackIcons
    group
    message
    onError
    onStatus
    onSuccess
    selector
    threshold 开始验证长度(对radio类型无效)
    trigger     触发验证的动作例如:keyup(按键)/blur(失去焦点)
    validators
}

fields.validators = {

    callback:{
        message:[string],
        callback: [function]
    },

    notEmpty

    numeric: {
        message:[string],
        separator: [function]
    },


}
栗子
$("#agentCreate").bootstrapValidator({
        feedbackIcons:{
            valid: 'glyphicon glyphicon-ok',
            invalid: 'glyphicon glyphicon-remove',
            validating: 'glyphicon glyphicon-refresh'
        },
        message:'不能为空',
        fields:{
            title:{
                validators: {
                    notEmpty: {}
                }
            },
            file:{
                validators: {
                    notEmpty: {}
                }
            },
        }
    }).on('success.form.bv', function(e) {
                // 阻止默认事件提交
                e.preventDefault();
            });
    $("#sub").on("click", function () {
        //获取表单对象
        var bootstrapValidator = $("#agentCreate").data('bootstrapValidator');
        //手动触发验证
        bootstrapValidator.validate();
        if (bootstrapValidator.isValid()) {
            console.log("bootstrapValidator", arguments);
            //表单提交的方法、比如ajax提交

        }
    })
操作
获取已配置的表单元素
$("#agentCreate").data("bootstrapValidator").getInvalidFields()
获取配置
$("#agentCreate").data("bootstrapValidator").getOptions()
重置某字段(会清空对应表单元素数据)
$("#agentCreate").data("bootstrapValidator").resetField("imgId","#imgSelector")
更新某字段状态(不会清空数据)
$(formName).data(“bootstrapValidator”).updateStatus("fieldName", "NOT_VALIDATED", null );
ubuntu root密码
因为ubuntu 的root密码是随机的
所以需要重新定义,输入两次 用户密码即可
$sudo passwd


