/admin/Sales/yesterday
$Event = \think\Loader::controller('admin/Sales','controller');
/admin/Sales/yesterday
$Event = \think\Loader::controller('admin/Sales','controller');
//保存文件
            //$_SERVER['DOCUMENT_ROOT']="D:/www/"
      //$_SERVER["SCRIPT_NAME"]="/项目名/index.php"
      $www_path=$_SERVER['DOCUMENT_ROOT'];
      $save_path=explode("/",$_SERVER["SCRIPT_NAME"])[1];
      $fp=fopen($www_path.$save_path."/public/data/SalesDay.json","w+");
      fwrite($fp,json_encode($result));
      fclose($fp);
//数组按照关键字排序
function array_sort($array, $on, $order=SORT_ASC)
{
    $new_array = array();
    $sortable_array = array();

    if (count($array) > 0) {
        foreach ($array as $k => $v) {
            if (is_array($v)) {
                foreach ($v as $k2 => $v2) {
                    if ($k2 == $on) {
                        $sortable_array[$k] = $v2;
                    }
                }
            } else {
                $sortable_array[$k] = $v;
            }
        }

        switch ($order) {
            case SORT_ASC:
                asort($sortable_array);
            break;
            case SORT_DESC:
                arsort($sortable_array);
            break;
        }

        foreach ($sortable_array as $k => $v) {
            // $new_array[$k] = $array[$k];
            array_push($new_array,$array[$k]);
        }
    }

    return $new_array;

}
这是一个TP3.2的中度开发者的学习记录
暂时只提供 官网下载 完整版的安装方法,并尽量调整到3.2的开发习惯,tp5需要在php5.4以上且非php6的环境运行。
thinkphp_5.0.5_full.zip文件,并解压到WWW目录,重命名为tp5 。找到 tp5/public/index.php 复制到根目录tp5/
此时目录应该如此:
tp5
├─application 应用目录
├─public WEB目录(对外访问目录)
├─thinkphp 框架系统目录
├─extend 扩展类库目录
├─runtime 应用的运行时目录(可写,可定制)
├─vendor 第三方类库目录(Composer依赖库)
├─build.php 自动生成定义文件(参考)
├─composer.json composer 定义文件
├─LICENSE.txt 授权说明文件
├─README.md README 文件
├─index.php 入口文件
└─think 命令行入口文件
修改tp5/index.php如下:
    // 定义应用目录
define('APP_PATH', __DIR__ . '/application/');
// 加载框架引导文件
require __DIR__ . '/thinkphp/start.php';
thinkphp/library/think/View.php如下:
    //原来这样
    //'__STATIC__' => $root . '/static',
    //‘__CSS__'    => $root . '/static/css',
    //'__JS__'     => $root . '/static/js',
    //改成这样
    '__STATIC__' => $root . '/public/static',
    '__CSS__'    => $root . '/public/static/css',
    '__JS__'     => $root . '/public/static/js',
此时应该可以访问:
localhost/tp5
此链接等效于(与3.2类似)
localhost/tp5/index.php/Index/index
模块增加暂时只知道用cmd的方法,如有新办法再补充,一般都是一开始cmd然后后面无限复制粘贴的了。
* 使用cmd 运行php环境,暂时只知道phpstudy的办法。
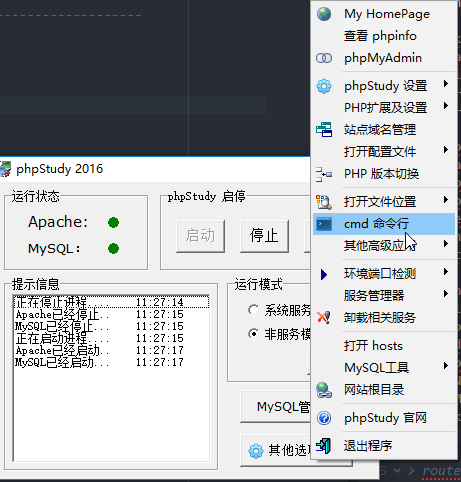
* 进入文件目录
cd WWW/tp5
php think build --module admin
控制器不再需要 [控制器名]Controller.class.php的名字格式,直接使用[控制器名].php并且在tp5/application/[模块]/controller下。
例子:Index模块下新建User控制器
index
├─contorller 控制器目录
│ ├─Index.php index控制器
│ ├─User.php User控制器
...
READ ME :浏览器访问控制器时
+ 会把任何驼峰语法全部转换成Aaaaa 的格式,所以文件尽量以第一个大写接全部小写来命名。
+ 会把 _ 后面一个单词理解为大写 例如:abc_d 就会访问abcD.php这个控制器。
use think\Controller;
如果继承了think\Controller类的话,可以直接调用think\View及think\Request类的方法
    public function index()
    {
        // 获取包含域名的完整URL地址
        $this->assign('domain',$this->request->url(true));
        return $this->fetch('index');
    }
先跳出3.2的数据库思维,tp5提供更多对多数据库操作的支持。
### 方法1:在admin中新建 database.php 文件:
      'mysql',
      // 服务器地址
      'hostname'    => 'localhost',
      // 数据库名
      'database'    => 'datadeal',
      // 数据库用户名
      'username'    => 'root',
      // 数据库密码
      'password'    => 'root',
      // 数据库编码默认采用utf8
      'charset'     => 'utf8',
      // 数据库表前缀//前缀只有在Db::name('user')这种情况下有效
      'prefix'      => '',
      // 数据库调试模式
      'debug'       => false,
  ];
 ?>
        namespace app\admin\controller;
        use Resportsale;
        use think\Db;

        class Datatransfer
        {
                public function test()
                {
                    $shoplist=Db::query('select * from tao_orders_oneday_test where id=?',[1]);
                    var_dump($shoplist);
                }
        }
[
    // 数据库类型
    'type'        => 'mysql',
    // 服务器地址
    // 'hostname'    => 'rm-vy1g8bdkp31vzn2aj.mysql.rds.aliyuncs.com:3306',
    'hostname'    => 'localhost:3306',
    // 数据库名
    // 'database'    => 'public_data',
    'database'    => 'jiexiu',
    // 数据库用户名
    // 'username'    => 'jusr9mw7rezy',
    'username'    => 'root',
    // 数据库密码
    // 'password'    => 'jsb869_MINI',
    'password'    => 'Janing351367',
    // 数据库编码默认采用utf8
    'charset'     => 'utf8',
    // 数据库表前缀
    'prefix'      => 't_',
    // 数据库调试模式
    'debug'       => false,
  ]
];
?>
        public function test()
    {
      $shoplist=Db::connect("db_typeA")->query('select * from t_user where id=?',[1]);
      var_dump($shoplist);
    }
<meta> 标签加入到你的页面中:<meta http-equiv="X-UA-Compatible" content="IE=edge">
<meta> 标签加入到页面中,可以让部分国产浏览器默认采用高速模式渲染页面:<meta name="renderer" content="webkit">
<!-- HTML5 shim and Respond.js for IE8 support of HTML5 elements and media queries -->

    <!-- WARNING: Respond.js doesn't work if you view the page via file:// -->

    <!--[if lt IE 9]>

      <script src="https://cdn.bootcss.com/html5shiv/3.7.3/html5shiv.min.js"></script>

      <script src="https://cdn.bootcss.com/respond.js/1.4.2/respond.min.js"></script>

    <![endif]-->
    $str="1234";
    $result=str_replace("2","",$str);//$result="134"
    $str="12-3-4";
    $result=str_replace("/(\w+)/","GG",$str);//$result="GG-GG-GG"
    $str="12-3-4";
    $result=str_replace("/(\w+)-(\w+)-(\w+)/","${1}-${2}-GG",$str);//$result="12-3-GG";
$str=file_get_contents(C("WEB_NAME")."/Public/Uploads/testdata.json");
      //去除换行符
      $str=str_replace(PHP_EOL,'',$str);
      $d=json_decode($str,true);
      if(!$d){
              //如果返回null,有可能是原json对象或数组结尾是逗号,这在json是错误语法
        $this->sendmsg("","请注意原json格式是否正确",1);
      }
      return $d;
最后,请注意“阻塞渲染”仅是指浏览器是否需要暂停网页的首次渲染,直至该资源准备就绪。无论哪一种情况,浏览器仍会下载 CSS 资产,只不过不阻塞渲染的资源优先级较低罢了。
    function SaferHTML(templateData) {
  var s = templateData[0];
  for (var i = 1; i < arguments.length; i++) {
    var arg = String(arguments[i]);

    // Escape special characters in the substitution.
    s += arg.replace(/&/g, "&")
            .replace(//g, ">");

    // Don't escape special characters in the template.
    s += templateData[i];
  }
  return s;
}
html
    h11
css
    a::before {
            content: attr(data-heading);
            }